Music XML files are not always beautiful to listen to, but with the right software, you can use them to effectively teach yourself your individual part.
The software that the MCTC Choirs have found really useful is a program called Finale Notepad. Notepad will allow you to isolate your specific part for the choir piece, and any other part of the piece that you want to focus on. This is a free software available for both Macs and PCs that can be downloaded here. In addition, MCTC labs have the full version of Finale installed in several locations on campus. You can find out these locations by clicking here.
The video below demonstrates how to use Finale Notepad (not the full version of Finale) with the choir XML files. Please note that this video refers to a choir CD for finding your music files. Ignore that and just browse to the location where you have put your music files (see step by step directions below).
Full directions are also printed below.
Directions for Using Finale Notepad
Follow the directions for downloading and installing the software, then come back to this page.
- Download the XML files from the choir website. You can find this file by navigating to Help/Practice. Scroll down until you see the link for the music. (It will be labeled something like Fall 15 XML.
- Unzip the file and save where you like (desktop is easy to find) – PC and Mac Directions for Unzipping files.
- Open Finale Notepad.
- In Notepad, click File>MusicXML>Import for XML files (or File>Open for MIDI files). Navigate to the file you wish to use.
- It can take a few seconds to import (or open), but once it is imported, you should have pages of music, with each part having its own staff line.
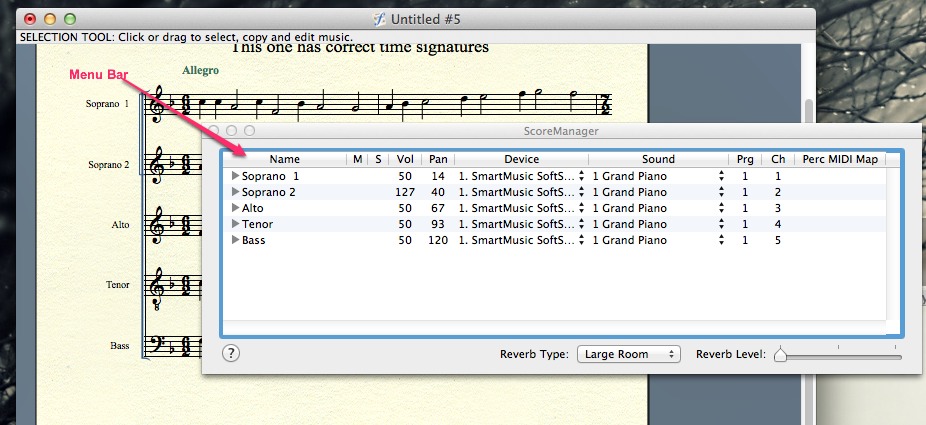
- On the pulldown menu at the top select Window>score manager. The score manager allows you to control what you hear.
- The score manager has a menu bar across the top:

-
- Name is for the part names (with XML – MIDI will often be labeled generically).
- M and S mean mute and solo respectively. Click by each instrument to either mute it or solo it.
- Vol means volume. The numbers often start all the same. If you would like your own part to stand out, give your part the highest number (up to 127) and the other parts lower numbers. You can change these numbers by double clicking on the number by the instrument that you want to adjust. (Try 127 for your part and 50 for the other parts to start, and adjust as needed).
- Sound allows you to change instruments – maybe you want your part to be a flute while everything else is piano – this can help a great deal. To change your instrument sound:
- Select your part.
- Click on the instrument.
- Choose “Edit Patch”.
- Click on the instrument name to the right of where it says “General MIDI”.
- Scroll up and down to find a sound you would like to use.
- Click “OK”.
- Try to choose an instrument that contrasts greatly with the other parts. Flute against piano is a particularly effective combination.
- You can experiment with these settings for each part – eventually you will find a combination that seems to work best for you.
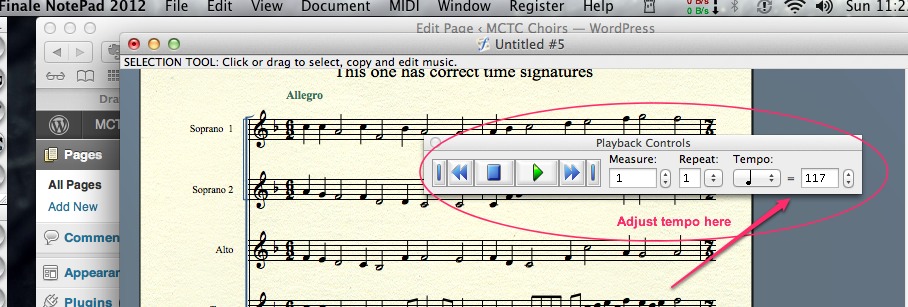
- The playback controls window also gives you some useful options. To reach the playback window, on the program menu bar select Window>Playback Controls. The playback window not only has standard playback controls, but also lets you slow down and speed up your tempo.
- To change your tempo, change the number that shows up under the word “tempo” by clicking on the box and typing in a new number. Higher numbers are faster, lower numbers are slower. You may need to experiment to find a tempo that you can practice with comfortably.

